Contact Us

Use the form on the right to contact us.

You can edit the text in this area, and change where the contact form on the right submits to, by entering edit mode using the modes on the bottom right. 


123 Street Avenue, City Town, 99999

(123) 555-6789

email@address.com


You can set your address, phone number, email and site description in the settings tab.
Link to read me page with more information.

Blog

Praesent commodo cursus magna, vel scelerisque nisl consectetur et. Curabitur blandit tempus porttitor. Fusce dapibus, tellus ac cursus commodo, tortor mauris condimentum nibh, ut fermentum massa justo sit amet risus. Cras mattis consectetur purus sit amet fermentum. Cras mattis consectetur purus sit amet fermentum.


Reprogramming Muscle Memory to Teach Correct Leg Compression

John Thornell

by Zohar Ambramovitz, Head Coach, Marina Aquatic Center

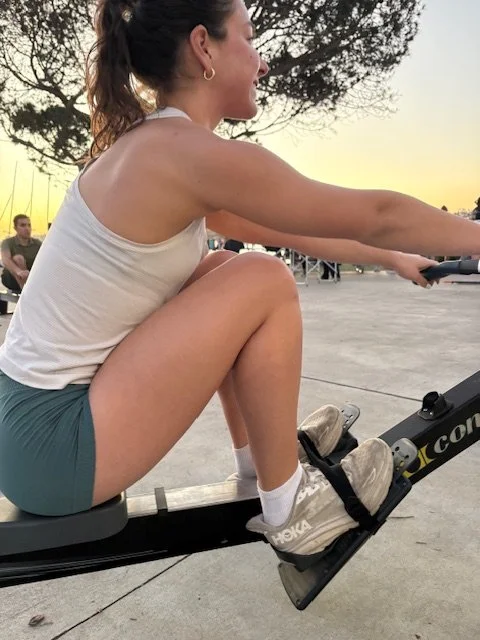
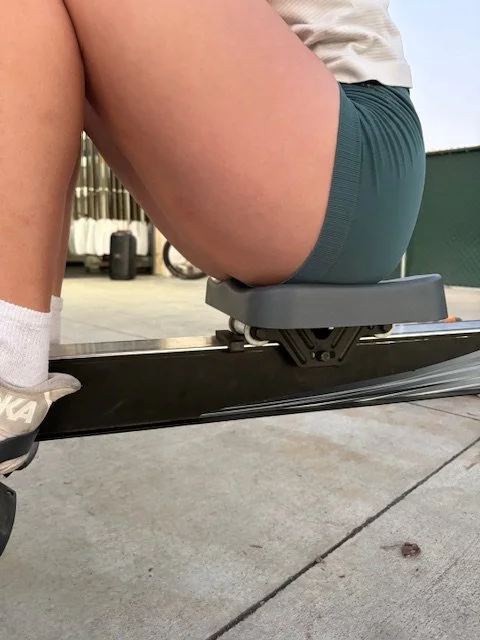
One of the most persistent challenges the MAC Junior Rowing coaching staff has is teaching rowers not to over-compress at the catch. “Several of our 120 high-school rowers tend to tuck their butts at the catch. Some rowers even hit their heels with the erg seat,” explains long-time coach Zohar Abramovitz. “This makes it difficult for them to effectively start the drive.” 

Over-compression, or hyperflexion of the legs, at the catch, puts rowers in a weak position at the beginning of the drive. “It takes rowers time to get their heels back down on the footboards, and un-compress to the point where they should start the drive,” adds Abramovitz. Hyperflexion can also lead to knee and back injuries.

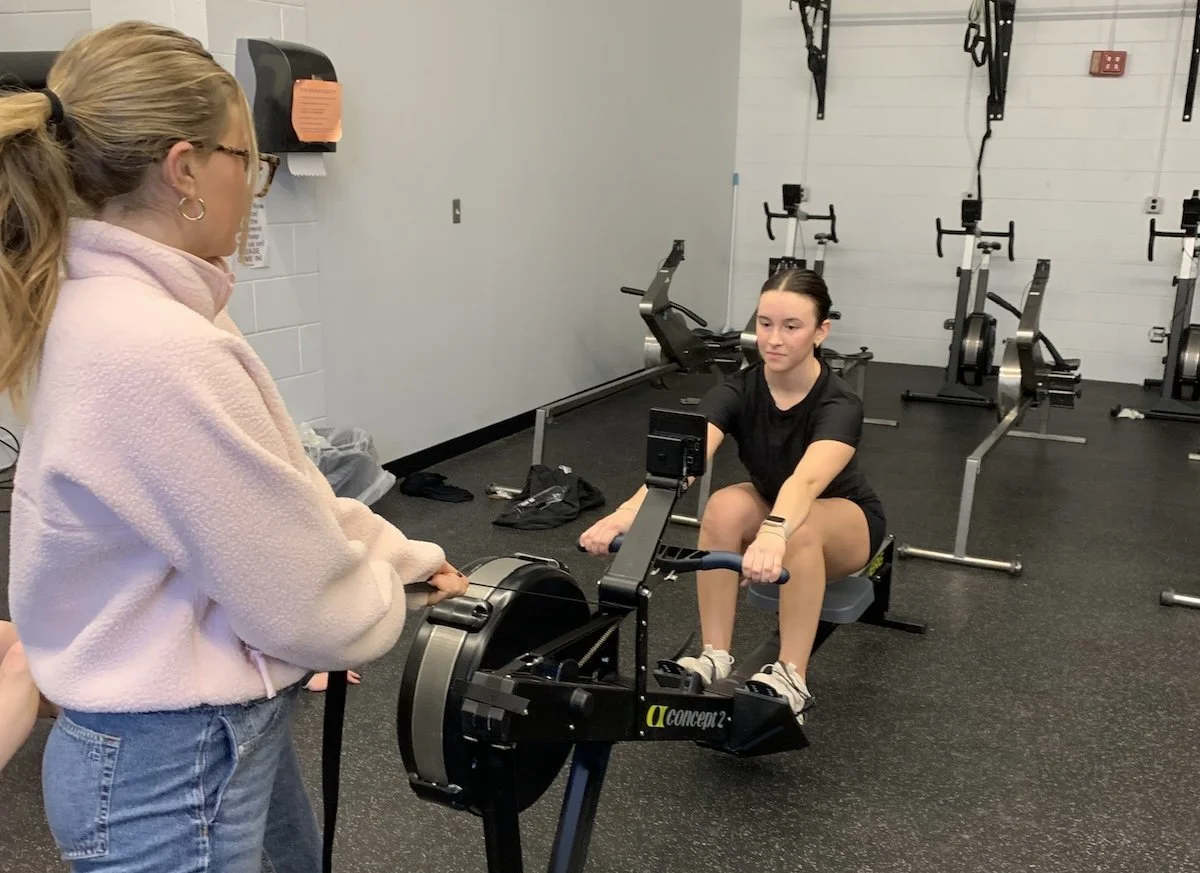
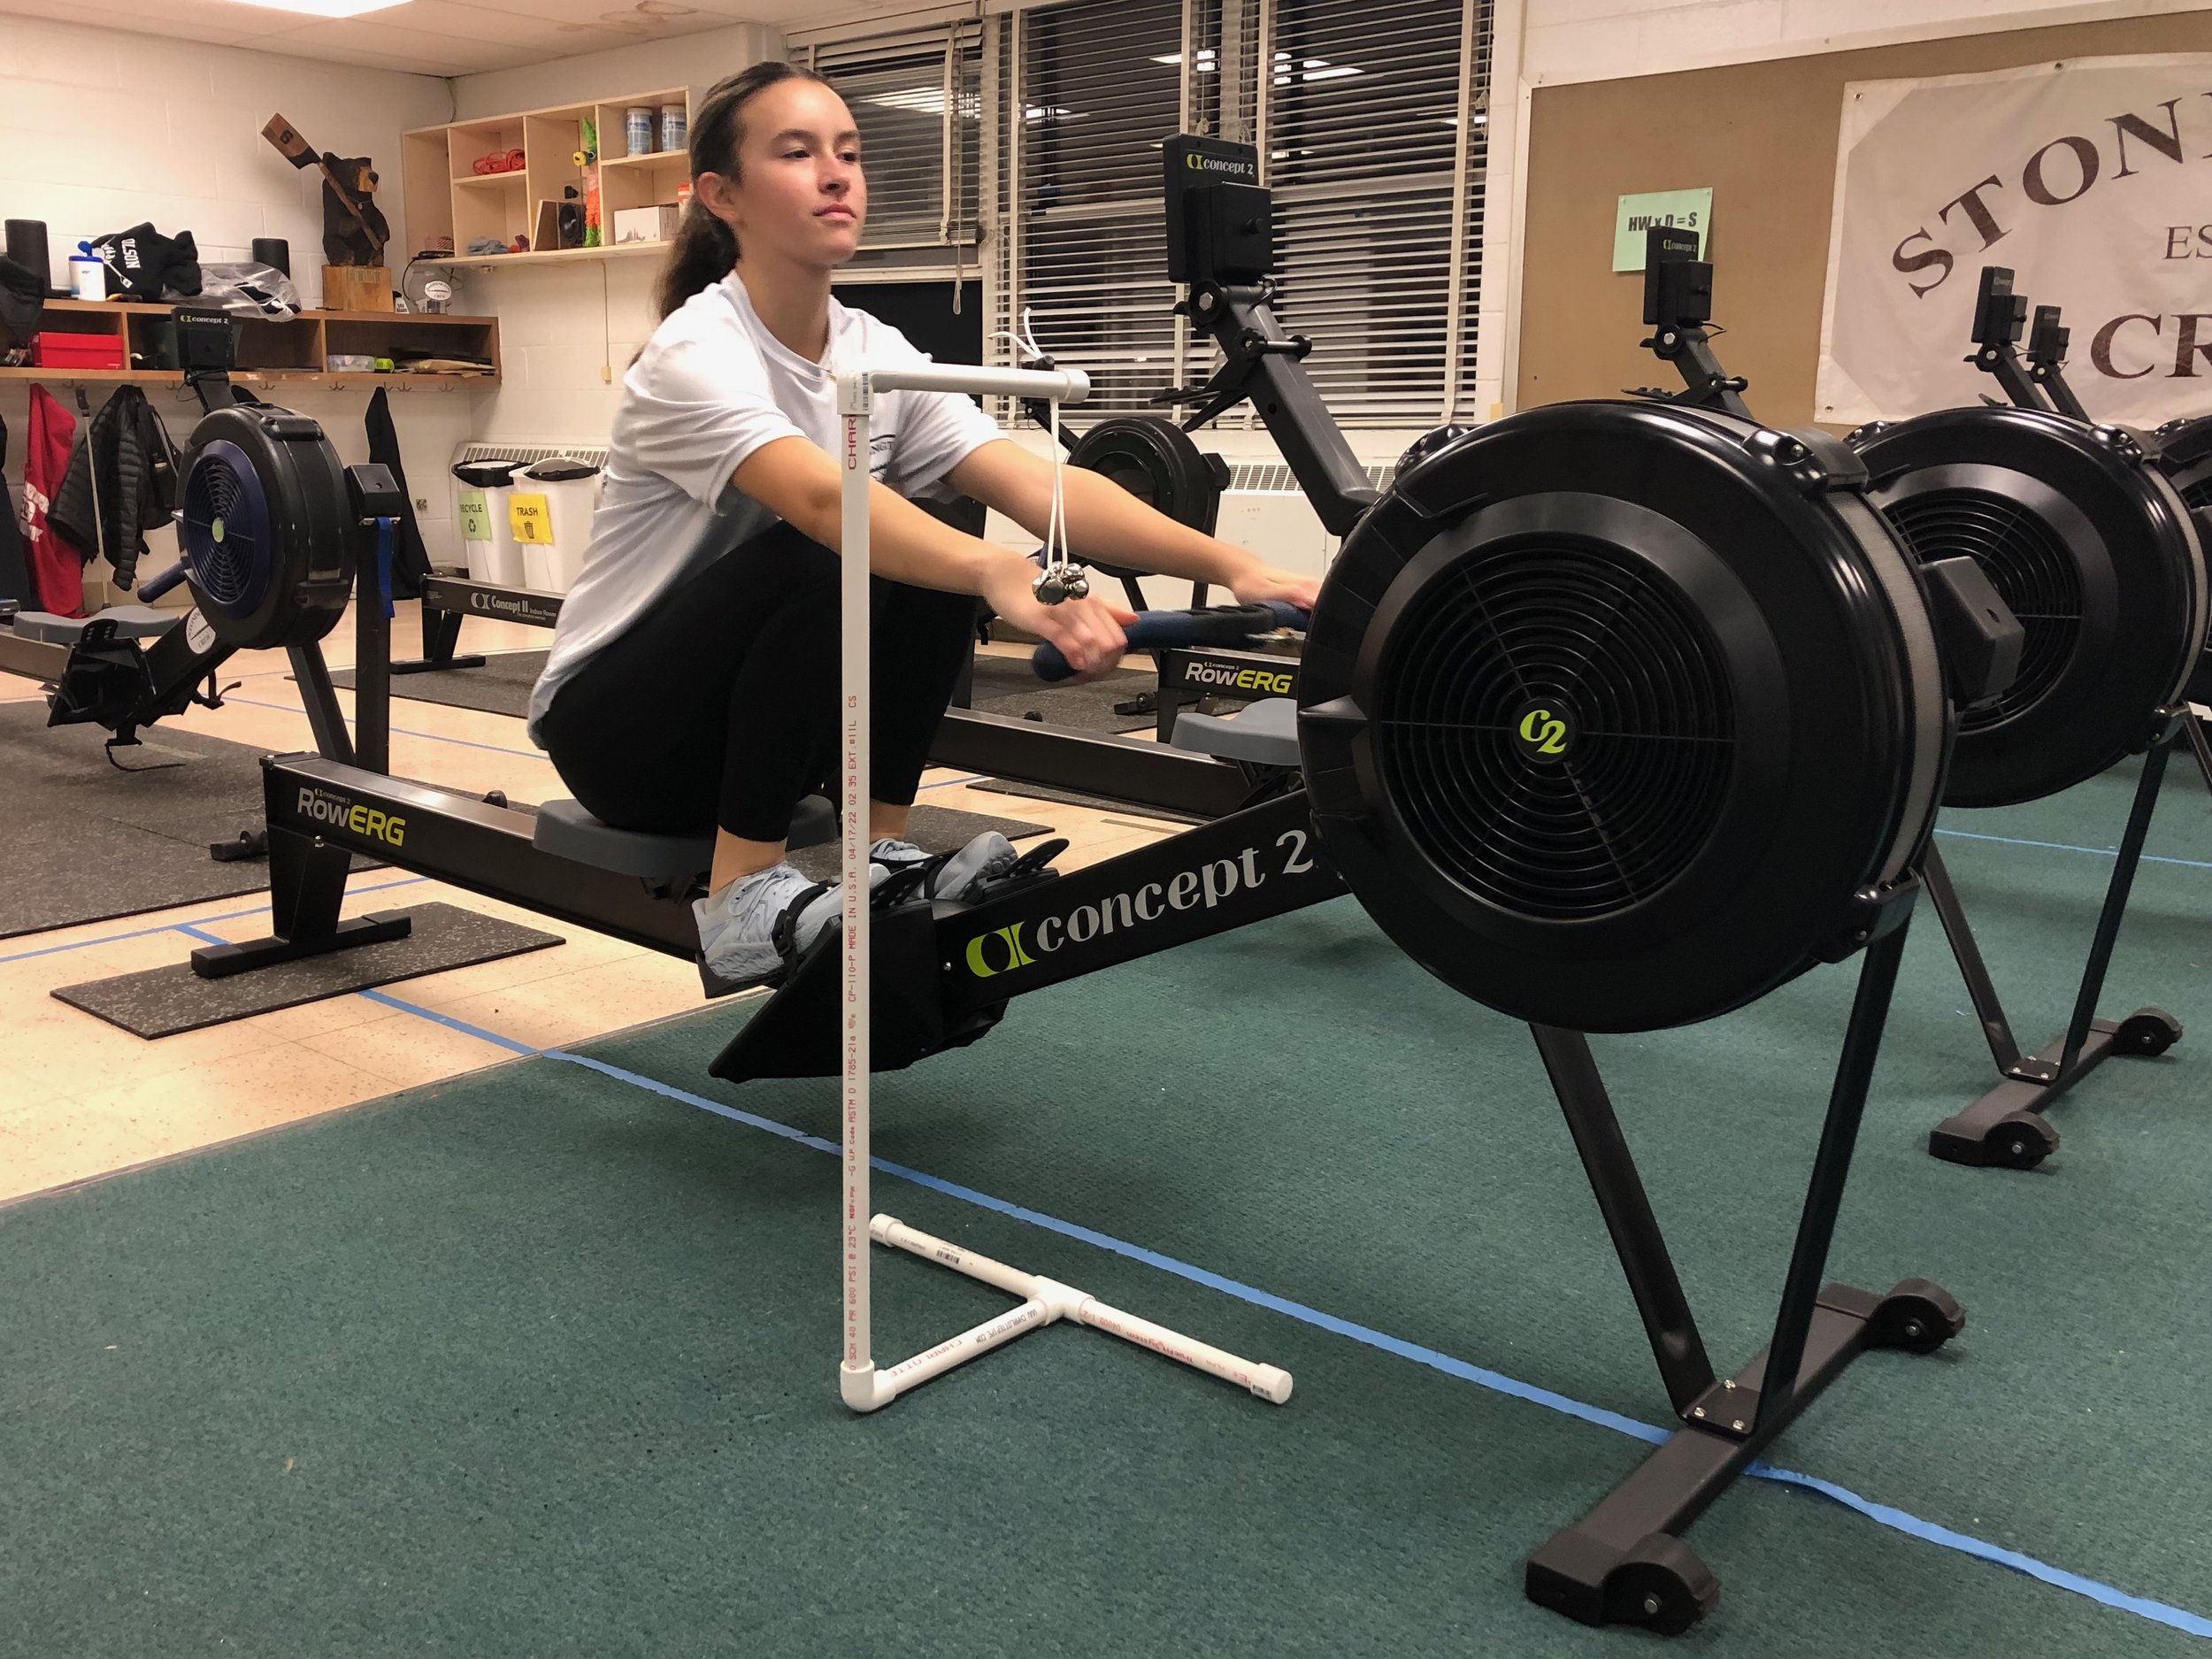
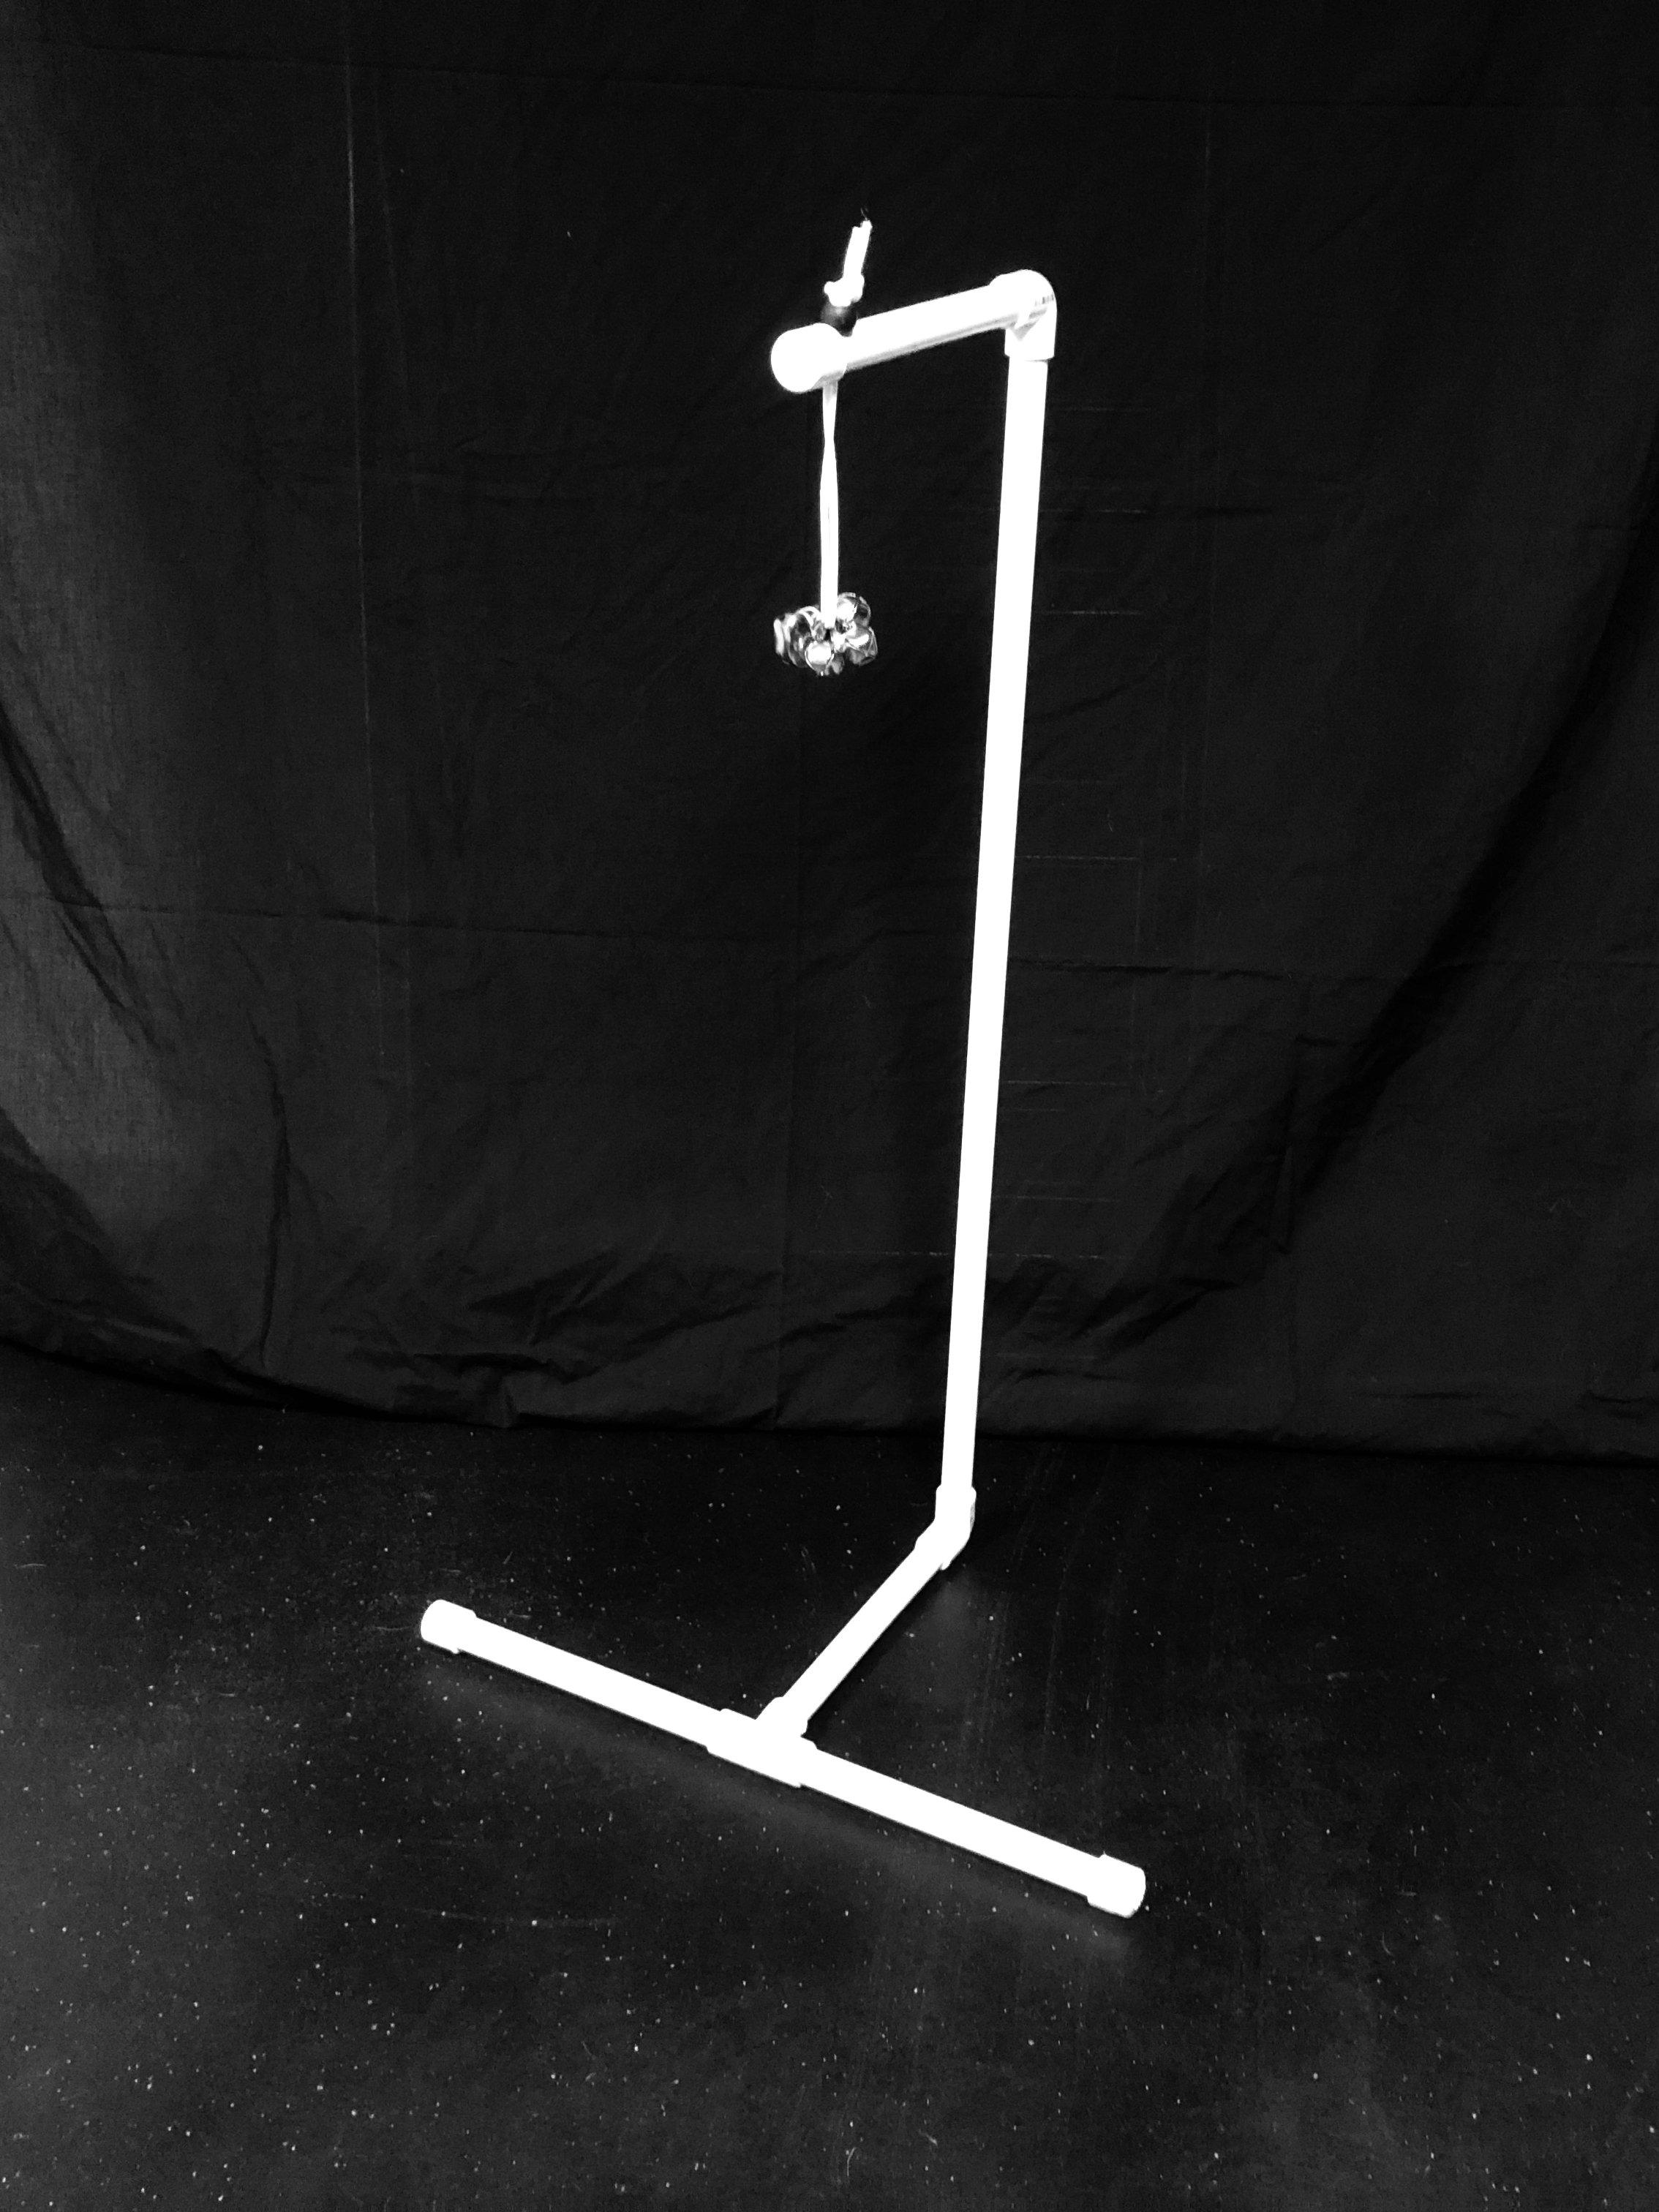
MAC coaches tried using different techniques to show rowers where to end the recovery. “We used electrical tape and seat bungees on the erg track to provide a tactile feel,” says Abramovitz. But rowers quickly wore out the tape and easily moved the bungees.

With his father’s expression in mind, ‘If you can think of it, someone else has probably already thought about it, and is making money off it’ Abramovitz found the leg compression guide online and ordered one for each of their 26 ergs at the UCLA boathouse. 

The guides serve as stops for erg-seat wheels and help rowers get their shoulders in front of their hips at the catch. MAC coaches set the guide for athletes. Each rower has their number where they should place the rubber stop. Coaches check in during steady-state pieces to see if the rowers moved the rubber stop off their number.

“We have definitely seen an improvement after using the guides,” says Abramovitz. He doesn’t have hard data on, for example, improved 2k times as a result, but does have what he calls eye-of-the-beholder evidence. “It’s a terrific teaching tool,” he says. “The guides help rowers reprogram muscle memory and put them in a more athletic position at the catch.”

Teaching Connection Through Kinesthetics

John Thornell

by Jim Lister, Head Coach Women's Rowing, Colgate University

How do we teach connection to our athletes?

First, we need to define what good connection is. This means engaging the correct muscle groups—typically the stronger, more powerful ones like the glutes and lats—while following an intentional sequencing pattern (which may vary by coach preference). Second, we must consider the feedback loop for the athlete. Is that feedback delivered through data, such as an RP3 screen or Excel sheets in the Peach system? Or can it be taught through kinesthetic learning—where athletes learn best by physically doing, feeling, and moving rather than just watching or listening?

The Grok Rowing Adjustable Suspension Strap has proven to be an excellent tool for teaching connection through kinesthetic learning. It helps rowers identify both the correct muscle groups and the appropriate sequencing at different points of the stroke. We use the strap for short sets of five repetitions at the catch, three-quarter slide, and half slide. At each position, athletes focus on engaging specific muscles, allowing them to feel the differences, evaluate what they are using, and begin building durable muscle memory.

Our coxswains have also been trained to lead these sessions, making the tool easy to integrate consistently throughout the season. We have purchased multiple sets of the Suspension Strap and Adjustable Suspension Strap so larger groups of rowers can work together, reinforcing shared language and technique across the team.

How to Position an Oar to Reach a Catch Angle Set From the Oarlock Pin

John Thornell

by John Thornell, Grok Rowing Founder, Stonington Crew Girls Head Coach, Stonington Community Rowing, Inc. Director of Rowing

Methods used to set catch angles, including the Grok Rowing Angle Measurement Tool, are usually made from the center of the oarlock pin. If an oar is positioned based on an angle set from the pin, the actual catch angle will be a few degrees less than the desired catch angle.

For some coaches, this is acceptable. As long as angles are consistent, the actual value of the angle doesn’t matter.

For coaches who want their rowers positioned at a specific angle, read on.

When the catch angle is set from the oarlock pin, but the oar is positioned to the stern of the pin, an adjustment of 3.0 cm (2.0 cm in sculling) is needed to compensate for this offset.

The image below illustrates this point. A yellow line is drawn at a 50° catch angle from the pin. When the oar handle is offset 3.0 cm (highlighted in red to the bow side of the oar handle), the oar is parallel to the yellow line and is also set to a 50° catch angle.

The 3.0 cm offset is calculated by adding the distance from the center of the pin to the oarlock face (4, below) and the distance from the oarlock face to the bow side of the oar handle (3). So, for this Concept 2 sweep oar, adding 1.5 cm to 1.4 cm will give us a 2.9 cm offset. For simplicity, this is rounded up to 3.0 cm.

The distance from the oarlock face to the oar handle (3) is calculated by subtracting the oar handle diameter (2) from the oar sleeve diameter (1), which is 2.8 cm. We then divide this in half to determine the bow-side distance of 1.4 cm. These figures are for Concept 2 sweep oars. The same calculations can be made for other types of oars.

So, how is this offset implemented?

After lightly marking the desired catch angle from the pin on the gunwale (silver permanent marker, pictured below), make another mark parallel to this and 3.0 cm toward the stern. A “spacer” that is 3.0 cm wide makes this process easy. Just align the spacer with the first mark to position the second. Pictured below is an aluminum extrusion cut to size. Any material will work.

The second mark (pink electrical tape, pictured above) is used to align the oar and position the rower. To avoid confusion, make the second mark more prominent than the first. An accurate catch angle will be achieved when the bow side of the oar handle is aligned with the bow side of the second mark (see main post image above).

Using tape that is 4.0 cm wide (the same width as the oar handle diameter) or 3.0 cm wide (the same width as the oar shaft between the inside handle and outside handle) will also help avoid confusion, depending on where the oar crosses the gunwale. The oar can be placed directly over the tape, instead of remembering which side of the oar handle should align with which side of the tape.

How to Set Catch Angles: Start at the Finish

John Thornell

Excerpts of a conversation with Tom Siddall, Harvard Heavyweight Assistant Coach, USRowing Para High-Performance Coach & Boston Training Center Coordinator

Setting catch angles depends on the boat and the athlete. For example, I have used different angles for this year’s PR3 National Team four compared to Harvard eights, which were also different from eights at Tufts and the U19 National Team/ODP system. At a minimum, I target a 54° catch angle. Often, people don’t realize how far the oar has to go to achieve that angle relative to the pin—it may require moving the rigger. As a quick shout out, I owe a lot of my knowledge here to Eric Gehrke and many others!

For me, it also depends on the time of year. The approach changes based on the group and other factors, but early in the season I often start at the back end of the stroke. Initially, I don’t worry about the catch side of things. As we go through the season, I set catch angles and change the rigging to achieve desired catch and finish angles (30° or more) based on factors like the boat speed, watts, and drive time.

Early in the season, it can be a tremendous load on rowers’ bodies to start rowing at, say, a 56° catch angle. This is especially true if they’re not taking the catch correctly or taking it too hard, too fast, or too early. I’ve found that by getting the back end right, crews develop a nice motion off the back that we can build on. Everyone lets go of the water at the same time, in the same way. The boat runs a little bit. Once I see this, I set catch angles and make individual adjustments.

This approach seems to be a confidence-builder for crews and helps us get it right at the right time of the season.

Coaches are often looking for a change at some point during the year. They’re looking for an effect. Looking to take a step in the right direction. Sometimes I’ve used catch angles to produce that effect—and to get athletes to think about it.

When I feel like something is a little off, I will check catch angles. Crews may be working hard and hitting the right rates, but their splits are just a second or two off where they should be. I then check catch angles to see if we can find a little something more by getting everyone lined up a little bit tighter. Usually, there’s not a glaring issue, like everyone getting stuck at the finish or skying the blade, that makes me check angles. It’s just a way to get everyone a bit more aligned.

When I set the angles, athletes will notice the pickup and heavier load around the front end. This is often when I’m transitioning from a back-end focused stroke to a front-end focused stroke. When we do start working on the front, we’re all at the same angle.

Make Your Own Training Guide: Handle Height Bells!

John Thornell

Recently, this device was featured in row2k’s Rowing Hack: Handle Height Bells. Here’s a bit more info on this home-made, hand-height guide and instructions on how to make your own.

First, the guide can help rowers in two ways:

  • Keep level hand heights on the recovery

  • Practice raising hands into the catch


Level hand height

Position the rower at the catch. Shins vertical, good body angle, arms extended, and hands at the desired height.  Place the guide so the hanging bells are in front of the rower’s knuckles. The bells can be raised or lowered using the round cord lock.

While rowing, athletes focus on maintaining a level hand height on the recovery—from their sternum directly to the hanging bells. They’re rewarded with a satisfying jingle at the end each stroke!

The tactile feedback is an improvement over visual aids. Rowers’ focus often drifts while using tape on the chain guard or other methods.


Raising hands into the catch

Once rowers master level hand heights, the next step is to practice “placing the blade in the water” while on the erg. From the catch position above, position the bells above the rower’s hand by moving the guide towards the rower and raising the bells using the round cord lock.  

At the end of the recovery (with level hand heights), the rower simply raises their hands to ring the bell before they push on the footboards. This can help with catch timing, while on the erg.

If rowers do not have level hand heights, they may “wind-up” to ring the bell by lowering their hands into the catch and raising them on the beginning of the drive. If this is the case, reposition the guide to practice the above level hand-height exercise.  

Materials:

The hand-height guide can be made using simple materials from your local hardware store and hobby shop.

  • 1 x Cord lock

  • 1 x 20” nylon cord

  • 5 x Bells

  • 1 x 32” PVC tubing (1/2” dia.)

  • 4 x 9” PVC tubing (1/2” dia.)

  • 2 x PVC 90° elbow fitting (1/2” dia.)

  • 1 x PVC tee (1/2” dia.)

  • 3 x PVC end caps (1/2” dia.)

Cut the PVC pipe to size. You will need four 9” length tubes and one 32” length tube. One of the 9” tubes, drill a hole 1” from the end. Insert this tube into an elbow fitting and attach an end cap on the end with the hole.

Attach the 32” tubing to the elbow fitting. At the other end, attach another elbow fitting. Insert one of the 9” tubes. At the end of this tube, attach the tee. In the other two openings, insert 9” tubes with end caps on each end.

Cut the nylon cord to 20" and solder the ends to prevent fraying. Fasten the bells to a ring, wire or zip tie. Feed the cord through this ring, then the hole in the 9” tube. Finally, insert the cord through the cord lock. Tie a knot and, voila! You’re done!

A Clever Way to Handle the Suspension Strap Set-Up!

John Thornell

by John Thornell, Grok Rowing Founder, Stonington Crew Girls Head Coach, Stonington Community Rowing, Inc. Director of Rowing

If you have used the erg suspension strap, you’ll appreciate this clever idea.

The strap’s bracket is designed to fit in the Concept 2 erg handle’s u-bolt. But it can be a little snug with the chain connector swivel sharing the same space.

If you have a spare erg handle lying around the boathouse, it can make things a lot easier! Even the older wooden handles work well.

Just leave the handle that’s connected to the chain in the erg’s handle hook or resting against the chain guard (pictured above). Connect the second handle to the suspension strap. Voila!

This is especially helpful when using a scale during isometric exercises to measure force. A second handle that isn’t connected to the erg chain will make it easier to connect to the scale. Since the chain is not connected to the handle, it also makes it easier for a coach, training partner, or coxswain to get a reading off the scale.